
hi all,
its been a while and i am working on a new project....a 90% frej (15 ft length and 19 inches beam) that i am trying to build up very light for my wife.
the basic approach is 3/16 red cedar with 4 oz s glass inside and out, internal seam kevlar taped, keyhole cockpit and a target weight fully rigged of 22 lbs.
given the hull form, it looks pretty important to have a skeg and wanted to see if anybody had suggestions for good plans that are easy to build or a well constructed skeg that can be bought/installed.
i just finished glassing and fill-coating the outside of the deck and hull....so i am not that far away from having to decide on how to approach the skeg. keeping it light but reliable and to work with the aesthetics of the boat is important to me as well. any suggestions/thoughts appreciated.
h
Skeg
Howard-
Do you want a cable ('push') skeg or a rope control skeg?
Bjorn Thomasson has some skeg info on the website; you've probably seen that.
Lots of folks have built their own 'from scratch' - Etienne Muller has info and good pictures of his.
It's a fair bit of work to build a good skeg from scratch, I found. Which can be part of the fun.....
Another approach which I've seen in some commercial kayaks is to use something like the KajakSport skeg and completely encase it in glass on the inside. Getting a good seal at the cable exit from the box is important.
If you are trying for a 22# kayak, you'll probably want the lightest and simplest option you can find.
I put a 'skeel' (skeg just abaft the cockpit) in my Frej builds (16' and 18') and find it works better in the shorter boat. An aft skeg would have a bit more authority to keep the 18' Frej tracking easily in side and following winds.
YMMV, etc etc...
Ets skeg
http://etiennemuller.com/SkegProject.pdf
detailed information on my website above, but a few shots to give the idea here.
further questions
etienne, john,
thanks for the notes. in answer to one of the above questions i want to use wire like a push rod to push/pull the skeg up/down. i was thinking 18 guage (approximately 1 mm) wire. do you have a wire manufacturer or specification you recommend that is also appropriate for marine use?
do you also have any more details on how you executed the control box?
below is a plan that i am modifying to not work with lines but with wire (not a very clean drawing...but the pencil marks are where i am doing the redesign work) i don't have a lot of deck height so the idea is to move the axis down low allowing the push/pull wire to come in at the top of the box with a very low angle to fit under the low deck. the approach allows the top of the skeg (most forward part when retracted) to be almost vertical) minimizing the size of the box/skeg relative to the in-the-water portion...which should save a couple grams:).
anyway...have been doodling all night....will think upon it some more.
h
Control box
My control box is very simple. The hinge on the skeg allows the cable to move with very little resistance, and the knob only needs to move an inch and a half to fully deploy the skeg, so there is no chance of the cable kinking.
The photo tells the story.
Skeg wire
Howard said:
..... i want to use wire like a push rod to push/pull the skeg up/down. i was thinking 18 guage (approximately 1 mm) wire.
Commercial skegs that I've seen use at least 1/8" (~3mm) 1 x 19 stainless wire.
I think some amateur builders have experimented with using carbon fiber push rod material, as used in model planes and boats.
Skeg cable kinks
Etienne said:
The hinge on the skeg allows the cable to move with very little resistance, and the knob only needs to move an inch and a half to fully deploy the skeg, so there is no chance of the cable kinking.
There are a couple of fairly common causes of skeg wire kinking.
Any unsupported skeg wire (i.e. not in a tube or channel) can kink if enough force is applied, and the longer the unsupported length, the easier to kink.
Scenario 1: Launch from a sandy (or worse, fine pebble) beach with a pebble or sand jammed in the skeg box - usually this happened earlier when landing. Try to deploy skeg; push hard on the knob.
Scenario 2: Forget to raise skeg when landing, or hit an underwater rock at speed. If the skeg control is stiff, the cable can kink.
You need to have some friction in the cable if you want to keep the skeg in its set position.
Don't forget to put a 'string' on your skeg so your paddling partner can pull the skeg out of the box for you, when afloat. If you paddle solo, check Freya Hoffmeister's blog for a nifty system for skeg 'pull-down' when jammed.
I use Nick's plans for the…
I use Nick's plans for the skeg, with one exception: I make the control knob and blade out of lexan. This gets me out of a few fill/drill/re-drill steps. A plug cutter drill bit makes the spacers around the pivot point nicely.
Skeg
I've recently put one of Nick's skeg in a Petrel and been very happy with it, and would probably go this way in next build as well.
That said, I've also retrofitted a Superior Kayaks kit into another build and been very happy with it.
different
I saw this, although a little rough, seemed like an easier box to install if it came through the hull. https://www.youtube.com/watch?v=Zpo8z4kFaZg
Skeg install
Sometimes it is a case of "this kayak needs a skeg" after paddling the boat for a while, so a retrofit is necessary.
If the skeg is part of a new build, it is much easier to install the skeg box before joining the hull and deck.
BTW, it's not enough to just make the skeg box attachment to the hull water-tight - the skeg box has to be secure enough that stuffing gear into the compartment won't crack the joint - i.e. resist sideways forces. I've seen this happen in a commercial glass kayak.
skeg-o-matic
I absolutly had to install a skeg in my guillemot that i built. building a petrel now and am incorporating the dkeg into tthe build. the guillemot weather cocks so bad that it sucks to paddle in any breeze let alone wind. the skeg is worth the extra time. nicks plans worked great.
how i am going about it
well,
i went with the advice of 'build your own skeg' as after a lot of research i could not find a commercial skeg that would work within the size limitations of the design. as mentioned in a previous post, i was also very weight sensitive.
i did a lot of research on the topic and was trying to find an approach that was not too difficult for me, would be sturdy and light and meet the design parameters i required. so there were a lot of ideas to sort through and i went with the approach described below.
first, i bought the skeg control box from superior kayaks as they already had a quick and easy glass molded part for the actuation technique i decided to use in this system. so at least that part was easy.
and then i built my own skeg and skeg box...and here are some pictures.
the first picture is the inside of the box and fin (carbon fibre over red cedar) before putting the face on it. i wanted to make sure everything worked properly prior to final assembly so there was a lot of dry-fitting and tweaking involved.
the design for the shape and profile of the skeg came with the plans for the frej and i stayed true to that. however, the engineering suggested was not, in my view, satisfactory, and that is where i departed from the plans.
this engineering uses a relatively rigid stainless steel wire with a little z bend in the end to actuate the fin. i have found this construction to be highly reliable, very sturdy and the wire is basically impossible to crimp/bend the way cable is. actually, one of the more difficult parts of the operation was making the z bend in the wire.
the next picture is the skeg/box fully assembled now and ready to go into the boat. the box, as suggested by ettiene is glassed cedar. in this case 2 layers of 4 oz s glass on the inside and one layer on the outside over 3/16 thick cedar. a piece of the stainless steel bolt from the picture above is epoxied into place to form the pivot point for the skeg. the entire assembly is about 5 oz (fin plus box) and, at least by feel, is very rigid/strong.
to put it in perspective, the skeg box is about 11 inches long and four inches high at its highest and the skeg itself is about 10 inches long. in normal drop mode is gives about 6.5 inches of depth on about 1 1/4 inch of throw of the cable. while it does not appear, at the end, to be an overly complex piece, i was surprised by the amount of time it required and how what appears to be simple, took a lot of planning and there were some re-do's on the skeg and box itself required before i could get everything working properly (like i said, the dry-fitting exposed a lot of problems i did not really think about). overall, i suspect i put over 50 hours into the construction so i hope it works in the boat as good as i feel about it now.
the whole thing should be in the hull in about a week. i have been busily working on outfitting the deck prior to getting ready to attach it to the hull. anyway, again thanks on sharing ideas. not ridiculously difficult....just a lot of little details to work out...so it was slow going.
h
Time and 'details'
Howard said:
while it does not appear, at the end, to be an overly complex piece, i was surprised by the amount of time it required and how what appears to be simple, took a lot of planning and there were some re-do's on the skeg and box itself required before i could get everything working properly (like i said, the dry-fitting exposed a lot of problems i did not really think about). overall, i suspect i put over 50 hours into the construction so i hope it works in the boat as good as i feel about it now.
Howard-
I found the same thing when building skegs - it takes time. Actually, for me, all the things that some people think of as 'extras' are the most time-consuming. If I had the strips on hand, I could build an 'empty' kayak quite quickly. It's all the things that make a kayak safe an user-friendly - bulkheads, hatches, end toggles, perimeter deck lines, skeg, etc.. that take the bulk of the time in a build, for me.
It can be tempting for beginner builders to underestimate the time and number of steps in a build, after viewing some videos and online instructions.
skeg position
i had a question i wanted to put out there....
on the frej project, i am working on, the design location of the skeg is well aft of the rear hatch such that there is no real access to the skeg box once the deck is on/in place.
i am thinking of moving it up, so while not underneath the hatch, to at least make it reachable by hand should i need to address any issue with the box (like to fix a leak).
i am thinking another advantage of moving it up a bit is the boat has a lot of rocker....so while moving it up reduces the moment arm of the skeg....its more likely to actually be in the water if its more forward....or so i think just looking at the hull. another way to look at it is that in the aft position the skeg will need to be pretty much full down to ensure contact with the water....more in....less down.
just curious how folks would make this decision.
h
Skeg location
I like to have a stowage space on the deck between the rear of the cockpit and the rear hatch. The hatch being a bit rearward, I find, makes it easier to stow gear efficiently too. A secondary benefit is that the skeg box is reachable.
So, my tuppence worth, it depends on where you put your hatch.
if you have already cut your hatch opening, and it is forward, then I would still opt to put the skeg box in the most optimum location for effectiveness. In the unlikely event that you need to get to it at some time in the future, it is an easy job to cut a neat access hatch to work on it, then put a lip on the opening and button the access hatch down afterward.
Et
Skeg position
Howard-
I have a couple of Frej's - one 16' and the other an 18' one.
I wouldn't worry that the skeg will be out of the water much if you install it in the designed position (as in the plans).
The Frej does have quite a bit of rocker but also sits quite 'securely' in the water.
That said, on both of my builds, I put the skeg just aft of the cockpit ('skeel' position). The skeg action is more 'neutral' in that position - improves tracking but doesn't affect the boat balance as much as a skeg farther aft. It works very well in the 16' boat but there have been a few times in the 18-footer when I've thought that the skeg farther aft would balance the boat better in side and aft winds. So my vote would be to use the position that Bjorn suggests.
In my opinion, a skeg closer to the aft hatch (not so far back) would be about the most awkward position when stowing gear. You'll likely find gear getting 'trapped' behind the skeg box. With the skeg in the usual location, gear tends to stay on one side or the other of the box, as long as you don't put very small items back in the stern.
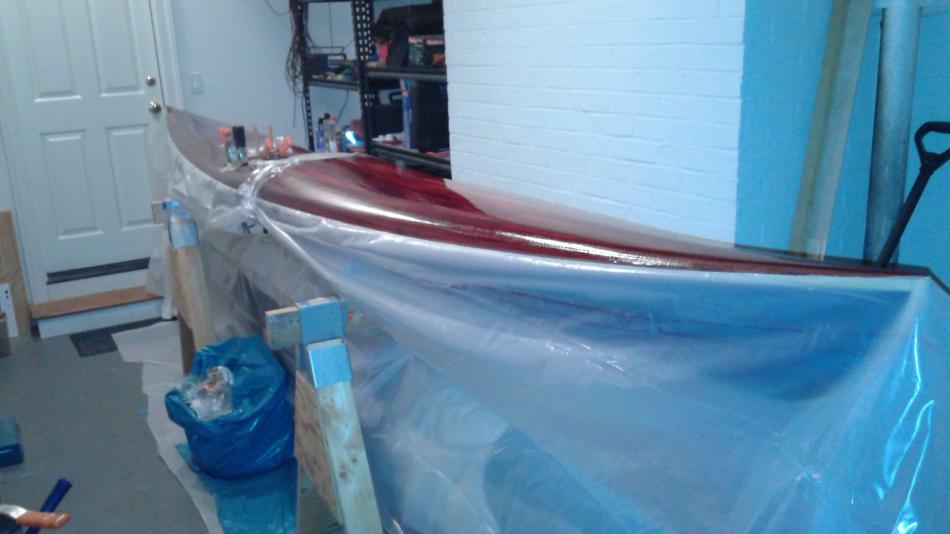
weigh in --- almost there
ok....i am trying to accelerate things as i want to have the hull together and the boat prepped for varnish before the building season ends (when i can no longer reasonably heat my garage)
so i completed the skeg install....thanks all for the advice...it's well aft and looks just fine. plenty of room for storage....though i don't expect my wife is much more interested in a lunch or dinner in the back.
so today i also did an interim weigh in to see how i am progressing against my target (22 lbs). well the answer is i have gained a bit of weight but i am thinking i will be well south of 30 lbs.
so far, all in weight now is 22.8 lbs. and only things left are seaming, bulkheads (foam), seat (foam) back band and rigging. so probably another three to four lbs based on weighing the bits on the side and allowing for remaining epoxy.
as usual...thanks for all the help.....almost there:)
h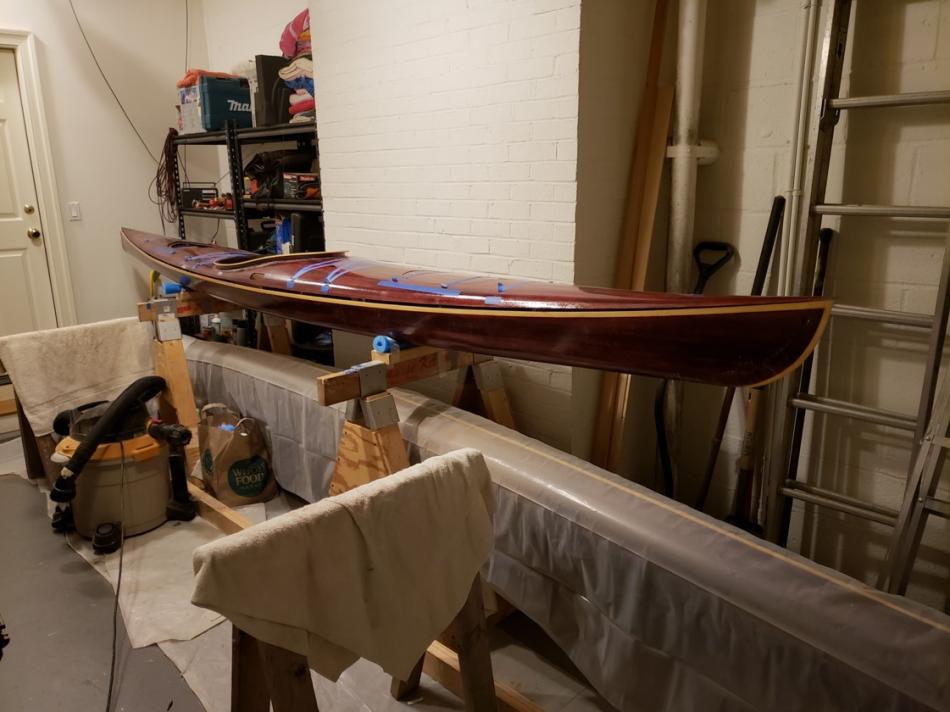
The boat looks fantastic! …
The boat looks fantastic!
John VB
Looking good!
Your boat looks great!
and only things left are seaming, bulkheads (foam), seat (foam) back band and rigging
Don't forget footpegs! And, please add good end toggles and perimeter deck lines for safety.
Before you varnish the inside of the cockpit, consider glassing some glass padeyes in convenient locations - for adding shock cord for your pump, attachment point for paddlefloat, bottles, etc...
BTW, glass panel or wood/glass panel bulkheads weigh about the same as foam and aren't so prone to leaking. Even more important for me is that I can't glass lashing tabs to the aft bulkhead if it's foam.
I know you want to get it varnished before the cold weather sets in, but it won't hurt the boat to sit over the winter if it's inside, cold but out of the weather.
Very pretty boat - I like the contrasting stems.
question - foot pegs and bulkheads?
John,
thanks for the notes. totally agree.....building light is not an excuse for poor safety practices...so i have plans for full rigging as you describe. i took all the bits (rigging shock cord, end toggles etc.)..and weighed them separately....hence the expectation of gaining several more pounds. that said, i will use a rigging attachment approach called soft rigging which avoids screws nuts and bolts....and save about a 1 pound with no degradation in strength (but does take a lot of labor to do).
i do have a question i wanted to put out there re foot pegs....i was thinking of using foam vs standard foot pegs which are pretty heavy...so was wondering if anybody had any ideas on elegant foot peg (or equivalent) approach that is light and functional.
i did also want to ask if other folks have opinion on the bulkheads (foam vs wood/glass). my rationale for it was more based on reading Nick's book and the consequences of a hull impact like sliding over a rock....and that the sponginess of the bulkheads can allow the hull to bend without cracking vs a hard bulkhead can more easily lead to cracking the hull. so agreed....its not a weight issue....but am curious if others have an opinion on the matter and their rationale.
many thanks for the kind words...still have to deliver though.
h
Footpegs
Just to put some numbers into the discussion:
The plastic 'Keepers' style footpegs weigh about 300 grams / pair ; the SeaLect locking ones are better (IMO) but weigh about 725 g.
Our feet are the way we transfer the paddling energy into the boat to make it move, so it's definitely important to have a strong place to put our feet.
Having adjustable footpegs is helpful if you lend your boat to friends for tryouts, or even if you change your footwear with the seasons. There's at least a 'one notch' difference between neoprene booties and rubber boots, with my adjustable footpegs.
In my 'personal' boats (ones that fit me, but aren't adjustable), I've moved to using the bulkhead (with a few layers of closed cell foam for fine adjustment) as my footrest. It's much more comfortable than footpegs, as I can move my feet around a bit while paddling. In a low-deck boat your feet may be more fixed in place - it depends on your foot size and the deck height. Obviously a very secure bulkhead is required for this - a foam bulkhead would be shoved out of place. Since a glass or wood/glass bulkhead isn't much (if any) heavier than a foam bulkhead, this might be something to consider.
BTW, in my opinion and experience wood strip core epoxy glass boat hulls are very stiff compared with factory composite or (especially) poly boats, so I don't worry much about the bulkheads being 'hard spots' in a flexible hull. If I were interested in playing in 'rock gardens' I'd opt for a poly boat. I seem to paddle on to rocks from time to time and have never had a problem, it would be different if a big wave dropped me hard on to one, I guess.
I have been 'stranded' for a few (long) seconds on a rock when I timed a surge incorrectly; again, no problem.
......but my boats are a bit heavier than yours.... :-(
Foot pegs
I too install timber bulkheads and have taken to using foam footpads rather than foot pegs, so much more comfortable over long distances to be able to move one's foot placement around. I angle my footpads with a wedge under the heel area so that my entire foot is supported.
Et
Angled bulkhead
A few more details:
I angle my front bulkheads at about 75 deg when I intend to use them as footrests.
I buy 'jigsaw' foam panels intended for nursery and workroom flooring (2' x 2' - 4 or 5 in a pack for $12 or so) and cut my bulkhead 'spacers' from that. On trips I usually carry an extra piece jammed against the 'other side' of the bulkhead (front cargo compartment) in case I find that the fit for my legs is too loose (due to settling and compression of the closed cell foam).
Foot pads
Yes, John. One's legs do indeed seem to get shorter after a half an hour on the water. ? I've noticed it too.
Et
foot pegs vs. bulkhead foot rest
I have used adjustable pegs and solid bulkhead foot brace on a few boats. I have found that occasionally I like to take my feet off the pegs for a stretch. When I installed a foam bulkhead/foot brace, I built up the foot position a bit on the sides and left a hollow in the middle for a stretch if I needed it. I have used 1" thick builders blue builders foam with an epoxy coating on each side and it is unbelievably strong. Closed cell foam is easier to install since it is forgiving on the fit.
My choice is usually plastic foot braces. I have never had them break vs. Yakama aluminum which I also have used which weigh and cost more.
foam examples?
John, Ettiene, Jay,
would you be willing to share a picture of how you approached the foam foot rest execution.
i think i understand the idea...but a picture is worth a thousand words:)
many thanks for the suggestions.....it is making me consider a couple changes on the final details here with respect to bulkhead and foot pegs. i was also wondering if i used the keepers plastic footbrace could i use just half the length....looks like there is a potential hole that could be used to secure it about half way down the length of the track.....since the boat is already for short-statured persons....having a full length track sounds like a bit of overkill. any thoughts on that idea?
today making a batch of carbon fibre pad-eyes for internal rigging....while i mull over these ideas.
h
Footpads
these are from two different boats. For total comfort angle may vary slightly depending on deck height at the knees.
Bulkhead as footrest
Getting the bulkhead in the right location is always a concern for me - too close to the seat is a disaster which would require cutting out the bulkhead and a re-do, and too far means that the stack of foam 'spacers' gets quite thick.
I've made a quick 'jig' which consists of an undersized (thin plywood) bulkhead shape screwed to the end of a 2-3' long 2x4 which can rest on the hull.
Bulkhead angle is about 75 degrees.
I put the jig in the boat with some weights on the 2x4 to keep it from sliding too easily. a helper can adjust the position via the front hatch opening or sometimes I just attach a line to the jig so I can pull it from the cockpit. Sitting in the boat (seat in place - temporarily sometimes), I can get the jig bulkhead in 'the right place' for comfortable paddling. After exiting (gingerly), I mark the bulkhead location. The actual bulkhead is placed an inch or more farther 'away' (toward the bow) - to give some leeway for mistakes and room for the foam paddling.
I use the same jig for fitting a cardboard pattern for the glass bulkhead - I tack the cardboard to the jig with a couple of dots of hot melt glue. This keeps the angle correct for bulkhead fitting.
It's not much to look at once it is all done. One thing I learned early on was to make a cutout at the bottom of the foam so I can remove it if necessary; it also helps with drainage. If the foam isn't a very tight fit, I've used tabs of adhesive tape or thin foam glued to the hull and foam to keep everything in place.
slight misalignment?
well,
i am down to the home stretch on the frej.....hull is seamed....bulkheads in (ended up with a solid bulkhead behind the seat and 3 inch closed cell foam.... for the forward bulkhead.
however, i did notice that it looks like my skeg box is between 1 and 2 degree or so out of alignment....funny...on the inside of the boat it looks perfect...but from the outside...just a tad off. if this something to worry about....since its more of a stabilizer than anything else....or do i need to cut it out and make that minor adjustment.
skeg of course has a little bit of play in the box as well and by light touch can easily be 100% right on alignment.
certainly don't want perfection to be the enemy of the good.... let me know what you think.
will be sending fuller pictures and weigh in soon.
h
Going in circles
a millimetre here or there are not going to be noticeable. If you look at some of the production boats on the market you will find tolerances are way more lax than you might expect.
Et.
Tolerances and symmetry
What Et said....
I was quite surprised some years ago when I was copying a famous design to build in epoxy strip.
The two sides of the boat were quite a bit different - more than just a millimeter or two.
Don't worry about a small bit of asymmetry - most folks don't paddle evenly on both sides anyway!
:-)