
Well, I must be getting old...the VJ, my Waters Dancing S&G Lightning 17, has a delamination issue at the underside of the cockpit deck. The brass strip on the keel is loose. Seat supports are broken. A couple of chines are ground down by a couple of millimeters...Shyte...this sounds like my body feels.
I started sanding her down to the epoxy last week...I'll be on it all day tomorrow to remove the old varnish and get it down to where I can expose all damage and start the repairs. Some of you might remember that I built a permanent camera holder under the deck. I've cut that out (thank you Sawzall) and I have a replacement that is not only longer to fit my big lens but will be removable (slide into built-in slots). I will repaint her using automotive paint and do some artsy stuff using metal flake. In the meantime, I'll be paddling my S&G Night Heron. It's a good life.
We need pictures! :)
We need pictures!
:)
Some sanding completed
VJ
Looks like a good project, I am sure you will have plenty of good memories as you work on it. Good hearing from you.
Scott...
...what’s really good is not being on Facebook. Too much mid/dis information there. It’s good to be back to the real world...this site. ?
Patching worn spots
I patched up a few spots in the cockpit where wear-and-tear was showing, including the area that dominates a little. Got the brass keel strips reglued as well. Found a couple of unwanted bulges in the previous Kevlar layout so I sanded them level and put patches of glass there, too. Tomorrow I'll start building the removable camera holder slots...the compartment itself is already built.
The patched areas in the cockpit
Brass Strips Reglued
Camera Holder
I am interested in learning more about your camera holder - can you share some pics and recommendations? Thx!
Facebook, the forum killer
It is very unfortunate that this site has become much less active since the advent of facebook groups. I remember being concerned about it at the time, because FB has no useful archiving system for people to search, and the same old questions come up again and again, and sometimes the blind end up leading the blind because folks with the useful information start finding it a chore to repeat themselves all the time.
I suppose is was inevitable but, personally, I think it is a bit of a tragedy that activity on this forum has diminished so much. John Abercrombie seems, more or less, to be holding the fort all by himself.
For a couple of decades I used to log on every day to see what was going on, and often share, and sometimes over-share. This forum was part of my daily ritual. These days I might drop in once a week or so, without expecting much movement. It feels like the end of an era, and I feel nostalgic about it.
The only way I can think of reinvigorating this forum is for us to promote it on FB, by suggesting people look for solutions here in the database and ask their questions here, but that is an extra click away, and research seems to have become an idle pursuit, demanding instant response, even if the information is sometimes suspect.
That is progress, I guess, but if it is not too much of a chore to maintain it, this is still a useful resource, and could become more active again, if enough of the new crop of builders get fed up with the transient nature of FB interactions and can find their way here. I shall continue checking in.
Et
Facebook, the forum killer
100% agreement with everything you said Etienne. For the last few months I have felt like I should be turning out the lights when I sign off the forum :(
Unfortunately, I have "O" interest in Facebook, don't even want to be in the neighborhood so someone else will have to promote us there . . . .
Several months ago someone wrote that they hated to see the forum disappear due to lack of activity. I reassured them that that would never happen to this great forum . . . now, not so sure.
I have read many opinions in other sources lately decrying the lack of good kayaking information available and that what is available is inaccurate, unhelpful or unsafe and many are getting tired of trying to provide correct information, as you stated, over and over again.
The future does not look good here :(
Facebook
I'm a 'NEVER, EVER,EVER!!' person about Facebook.
I won't deal with it, won't join, and wish Facebook the worst, now and in the future.
So perhaps it's not surprising that I still check in here often.
There may be less amateur kayak building going on? The designers who sell plans and companies who sell kits could tell us, I suppose.
Many forums seem to be dying - seakayak forum is gone AFAIK, this forum is less and less active (not helped by the change in software here), and even WestCoastPaddler is noticeably quieter nowadays.
Popularity of boatbuilding.
John, from what I see my feeling would be that small boat building in general is steadily growing in popularity. Online forums are just going out of fashion.
Facebook Sucks!
I will never join anything like Facebook again. This forum is far far more informative, personal, and welcoming. Facebook is nothing more than a capitalistic, opportunistic, narcistic, propagandizing place where sheep congregate to find ways to think according to their influences. It was originally interesting enough...but not now. Now, I gotta story to post.
Kent Roberts...camera holder
Kent, I'll be busy quitting my job tomorrow, once done, I'll take the time to post images of my camera holder success. Stay tuned.
Re: camera holder
Thanks Robert! No rush, I'm probably a year away from building a kayak. Good luck with the job situation.
Facebook
I just came to kayak building 18 months ago. I also wish the group was more active, but part of the problem is that in almost all cases you can find the information you need without having to ask questions. With searching of forum archives, blogs and videos there's not too much you can't figure out.
Way back I liked Facebook for keeping up with friends, family and events going on around town, now it's mostly ads, political rants, cat videos and memes.
The Camera Holder
By the images I post, you can see that I have a long lens to accommodate. It's length is 2 inches longer than the camera with mounted lens. It will slide into slots and be removable. The first one I created was not removable and caused my partner, Shannon, to scrape her shins on it. The new one can be removed or shoved further back into the cockpit to accommodate longer legs than my short little chicken legs, or cute little legs, as Shannon laughingly calls then. Oddly, these cute little chicken legs were the 8th faster little legs in Alberta for the 5 mile cross-country championships back in their heyday. Anyway, back to the camera holder. The shape of the holder was decided by the angles of the camera with lens attached. The shape is pentagonal, the length, as I said, is longer than most men's lenses. The hanging supports were angled according to the deck angles of the VJ. The images tell the story as to how I set them. Tomorrow, I hope to glue I to place the slots. I'll post pics of that once done. Shannon doesn't appreciate how my newly cut mop sticks out in all directions...I think the epoxy I got onto and into it should help it look more tamed. You've seen the movie There's Something About Mary....well, there's something about Rob...it's epoxy, great, nicely permanent hair goo.
Robert (Glue i)N (his hair) Pruden
Alternative use for ROS
Thanks - camera holder
Thanks for the pic. That's pretty much how I was thinking it would look. I like the idea of making it removable.
Camera Holder
I got the guides glued to the top edges of the camera compartment today, also put a seal coat on the slot pieces. Tomorrow I'll glue the slot pieces into place.
Slot pieces seal coated
These slot pieces will need some shaping before I glue them to the underside of the cockpit
Slot guides installed
As you can see by the image, I got the slot guides installed and used a few old bricks to weigh them down into place for some firm glue contact
Removable Camera Holder Install Successful
I got the slots to hold the camera holder glued into place. The camera holder sits well in the slots and slides all the way into the back of the cockpit. Now when I climb aboard the camera holder doesn't scrape my shins and I can forego having there at all. I'm pretty happy with the install. I'll smooth out any rough spots when I start doing the finishing g work on the VJ. Incidentally, I used -8 - -15℃ Swix Ski wax on the camera holder glides to keep them from being glued to the slots. The wax does help lubricate the guides while sliding the holder in and out of the slots
Camera Holder in rear position
The camera holder now slides back 12"'s further than the old permanent position. During expedition kayaking, I usually stow a medium sized Pelican case containing electronics behind the camera holder, I can still do that.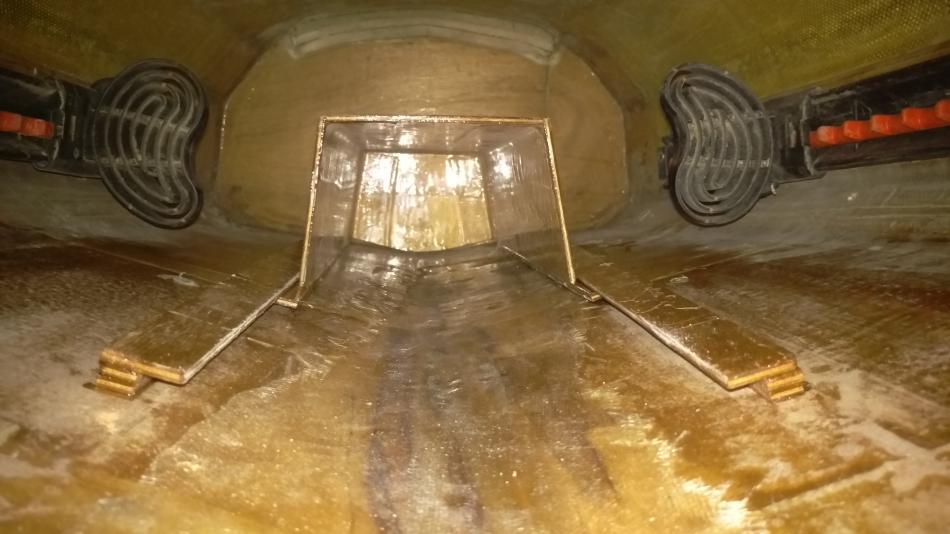
Et, I reread your post.
The best way to get folks back here is to keep posting stuff as if they were still here and reading. I do feel a little guilt for turning to Facebook, I connected to a lot of family there and it was tedious to duplicate posts. I think I made a mistake by using Facebook but never have I erred by posting here at this site.
Over the next year or two I will have enough projects going to keep posting useful, interesting, and even informative stuff. Once my canoe reno is complete (a week) and the VJ is done (end of July), I'll start on a Waters Dancing S&G canoe (beautiful to look at when done) complete with a retractable keel (maybe), a removable mast and sail, a removable rudder, and built-in beer/wine glass holders, maybe a place to lean back and chill out on the floor.
Hopefully these activities will help drawn folks back. Of course, I'll keep being me and inject my personality into my posts...in the past I have been told that this is a good thing.
Fillets along the outside edge of slots
I made up a batch of epoxy thickened with wood flour to a peanut butter consistency and put fillets along the outside of the rails of the camera holder. These fillets will give the rails significant strength without affecting how the rails work.
Posting projects here.
Rob, I think I am speaking for all of our circle, when I say that you are sorely missed on Facebook.
There was a stats function on the old iteration of this forum, and I do believe that my POLEDANCER thread was statistically the most active thread in its entire history. I take huge pride in that.
I agree, we should keep posting new projects. I would be at the moment, but my current project is a sailing boat, not a kayak, so I am not sure it would be appropriate. Also, with the old site one could hotlink images from one's own website, so space was not being taken up on Nick's server. On the other hand, the hotlinking would have been doubling the data throughput, which historically might have been an issue. The old stats confirmed that posts flagged as containing images were viewed many, many more times than those containing only text. So a picture obviously does paint a thousand words. I loved the format of the old forum. It was so easy to follow contexts within a thread. I think we lost quite a few members when the format changed. No fault, of Nick's. The technology became unsupported. That is progress... ?
Anyway, it is nice to see you back in the fray, and I, for one, will continue checking in, and contributing, if I have something interesting or useful to share.
Et.
Etienne, I have viewed your…
Etienne,
I have viewed your quality work for a long time. I am not going to build a sailing boat and I suspect many here are not either but . . . there is much to be learned from your techniques used to reach a goal. Following your 'problem solving' process is very educational to me. Unfortunately, I am not willing to join Facebook to view your wonderful work, (I have to draw the line somewhere) but I would love to have access to watch your progress if there is any way - - especially photo's :)
Thank you,
President of your fan club :)
Link to current project
Hi Randy. This link should get you to my current project. I find it handy to keep the log in a FB gallery while the project is ongoing, Then once it is finished I weed out a lot of the photos and do up a proper gallery on my own website. For people who want to watch the progress in real time though, this is the link.
Et
https://www.facebook.com/media/set/?set=a.2263337930393674&type=3
Amazing
Amazingly beautiful work Etienne, you are becomeing a master of your craft - no punn intended.
Thank you very much for the link. I do have to admit one thing though, everytime I see photo's of your work area I feel I should be coming over there for a week or two and tearing out a couple walls and adding 12'-15' to it just so you will be able to turn around :)
Thanks again,
Randy
Space
Yes. There is never enough room. If I did it again, there would be a small house with a big workshop.
what groups are good on FB?
new to building and paddling. like this forum and hope it can get more activity. i come from the R/C model boat world and the biggest forum for it has gone away too and as unfortunate as it may be that community mostly communicates on FB now.
i will post about my upcoming projects here in the future, but i have struggled to find any good groups on fb that are kayak building related, so a point in the right direction would be appreciated.
are there any good resources for calendar of events? such as gatherings or festivals?
Four solid days of sanding...only half done
I have been sanding off the graphite/hexaboron nitride anti abrasion coating from the bottom of the VJ. I'm using 60-grit on my Dewalt ROS, it's slow going...very slow going...proof that both work to protect the bottom of the kayak. Going to try 40-grit tomorrow. I could have left the coating on the hull but, after 10-years, I think it's wise, very wise to remove it and look for damage...already found a few minor issues. Once I'm done this part of the restoration, I'll go over everything with a fine tooth comb and make certain my t's are dotted and my eyes crossed before starting any finishing work. I still need to prep the hatch openings for the magnets...that will take some doing but I have everything I need and know what route I'll take to get it done.
Sand Paper - ROS
I was using a cheap brand of 60-grit paper to sand off the anti scratch coating...each piece lasted 10-15 minutes before I needed to change it up to a new one. Got frustrated because the job was taking too long so I bought a few 40-grit disks made with zirconium...each piece lasted 2 -hours and were still usable...just slowed down a touch in digging through the coating so I changed them up to keep the ball rolling. If I can find finer zirconium based disks, I'll make them my preferred choice for sanding. The image below shows the packaging for those of you who are interested.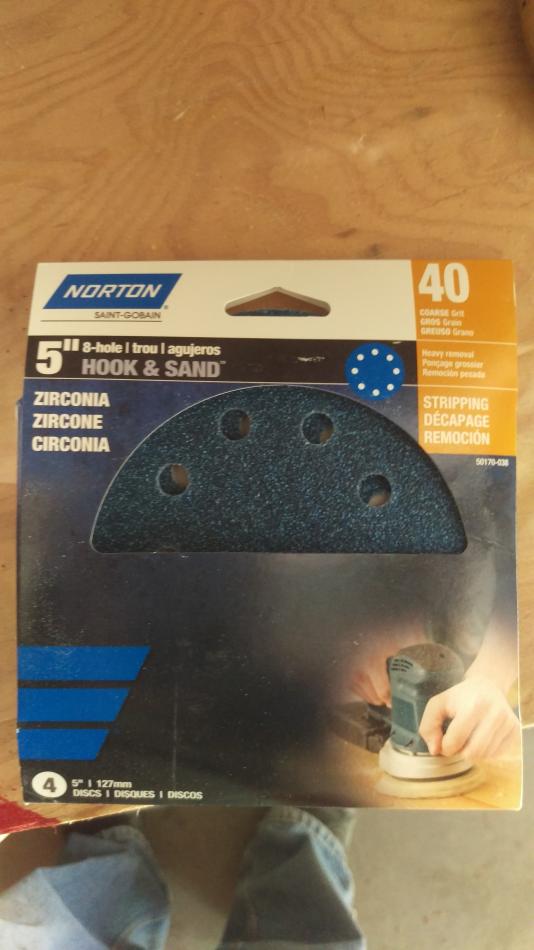
Almost done sanding
Taking the car to the carwash...it looks dusty.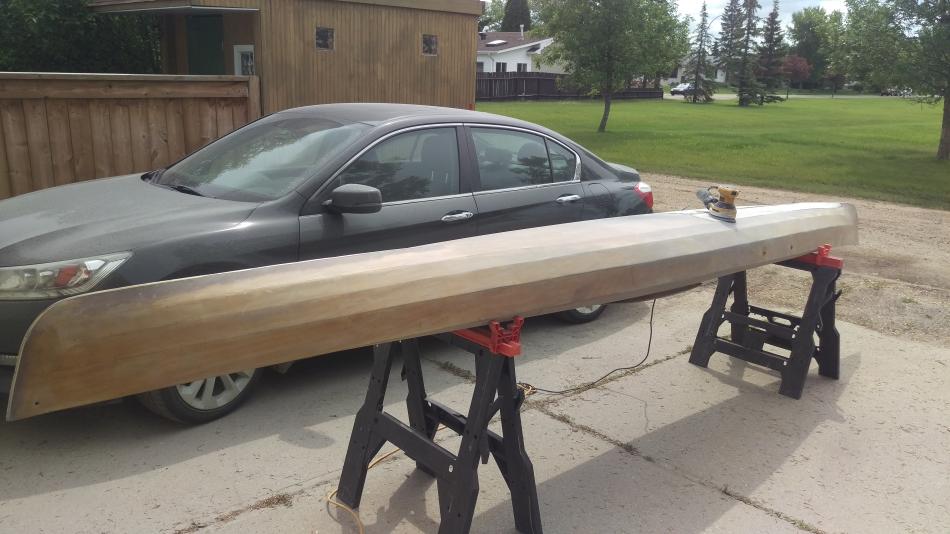
Worst bit done!
I'm impressed at your perseverance, Robert.
When I refurbished my Petrel, after a too-close encounter with some stone steps and a big wave in Venice, I gave up and stripped the fibreglass off using a heatgun. It was also finished with an anti-abrasive, and sanding was ridiculous.
Keep the pictures coming, please!
Hull sanded, converting strap down hatches to magnetic seals
After many days of sanding, the hull is sanded down to the glass (and maybe some wood). I moved to converting my strap down hatches to magnetic hold downs. Man, lots of work to do the conversion...I hate undoing my work because I usually build something to last forever. The first step was to use the hatches as a template to draw the wider opening around the old deck openings into which the hatches will fit. Then I used my trusty Bosch jig saw to remove the excess material, then sand the edges of the new opening such that I had good shape and about 1/8" extra width, then create new pieces of wood for under-deck magnet/hatch supports and spacers, then sand to smooth and shape them, then glass over the magnets as necessary (as per Rob Mack's video). Then I created a support to hold the 1/2" magnets to the underside of the hatch, fitted these supports to the lower magnetic support, then drilled 1/2" holes where the magnets would be set. I used 10 magnets on the hatch and ten on the lower support. In hindsight, I should have used more because the magnetic grip is not quite strong enough but I will correct that later. The hatch had a perpendicular support on the underside which ran the length of the hatch along the seam (two halves) and was about 1.5" wide: this had to be removed because the hatch was not sitting flush with the lower support lip of the top of the deck: it was a wee bit warped. I used a dremmel fitted with a side-cutting bit to dig through the fillets and glass holding it in place to remove it, then used a metal straight edge and utility knife to carefully cut through the epoxied seam from the top of the hatch until slight pressure caused it to cleanly break apart. The edges of the seam were then sanded flat. I sanded all residual fillet and glass from the underside of the seam, then carefully fitted the hatch halves into place, sanded off anything that prevented the hatch from laying flat and presto, I got a magnetic hatch that fits perfectly and flush with the top of the deck. I finished up today's efforts by setting the hatch halves in place, ensuring that the center-line of the two hatch halves were in line with the seam on the deck, made sure there was no magnetic resistance causing the hatch halves to want to change position, then I wetted out the edges with
epoxy, then whipped up some thickened epoxy using wood flour to fill the hatch seam as much as possible. Once that seam is cured enough, I will remove the hatch and fillet and glass the seam from the underside to give it decent strength. Knowing me I'll unthinkingly place my fat butt on it one day and risk cracking it apart. The images below show some of the process I went though. Next job is to do other hatch.
Cutting the new opening
Showing the two hatch halves…
Hatch newly fitted and pretty flush looking
Hatch seam wetted out and…
Shop Lighting
Set up some much needed lighting...16 feet of double row LED ready to hang stuff I discovered at Costco. I can see clearly now all scratches and flaws...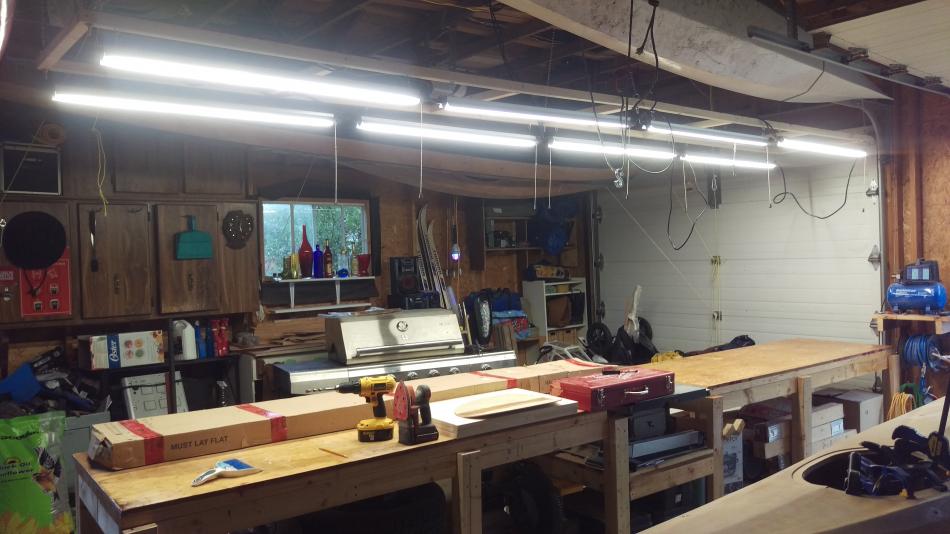
Sigh! Mixed a bad batch of epoxy
I am posting this for anyone who forgets to mix the correct ratio of resin to hardener. I was supposed to do a 3:1 ratio...I pump from resin gives 3 parts, one pump from hardener gives 1 part. I did 3 pumps resin to 1 pump hardener...that was a 9:1 ratio...oops! Fortunately, I was coating the bottom of the hull with a layer of epoxy/graphite and not laying out new glass.
I realised the error of my ways late last night while I was sleepless. I corrected my syrupy problem by scraping off the bad batch using a spreader, then I used shop wipes (blue paper towels) soaked in acetone to clean up the residue. The hull came out perfectly clean. I mixed a few good batches this afternoon and got it coated properly.
The moral of this story, for you who might believe that life is over after such an error, that it's fixable. Note that if you layout glass and make such an error, you must remove the glass and clean things up...the glass cannot be saved.
Robert N(ever makes missteaks) Pruden
Deck work
I have completed the worst of the restoration on the VJ. I got the graphite coating on the bottom of the hull down nicely. Today I laid out old and new patterns for deck art. I will reinstall the Canadian maple leaf I had on it before but now it is done in metal flake. I've also decided to run a stripe of metal flake along the sheer panel from front to back and I also added metal flake to the coaming and riser. I may have went a little crazy with the metal flake but I think it should look good once its all said and done. The image shows the rough work on the flake. Tomorrow I will remove the tapes and rub off the excess flake, then give the kayak a final coat of epoxy to seal in the flake and add more unnecessary weight to the kayak. Sigh!
Robert N Pruden
FlexSeal for homemade gasket: front hatch
Ok, I watched a commercial on TV for a liquid rubber compound called Flex Seal, you just squirt this stuff on water problem areas and it seals off the water quickly. I needed something to seal my magnetic hatches and, knowing that I did not allow for a reasonably thick layer of foam stripping to seal the hatches, the guy on the commercial convinced me to give this stuff a try. I squirted the stuff around the lip of the hatch opening where the rare earth magnets are attached,I covered the area with a layer of heavy plastic sheeting, then I carefully put the hatch in place to let the magnets press the hatch into the Flex Seal so that the Flex Seal conforms to the shape of every little bump and groove. I let the stuff cure for a couple of days. The plan is to apply more Flex Seal to the underside of the hatch cover, cover with a layer of heavy plastic sheeting again, and set the hatch into place over the opening so that again, the magnets press the Flex Seal into conformance again. The layer of Flex Seal on the hatch opening lip, once cured, should not stick to the Flex Seal on the underside of the hatch and I should get a watertight rubber seal between the two surfaces. I will get this done during the week and test the final seal with pressurized water from the garden hose. Otherwise the kayak is finished. My sliding/removeable camera holder works beautifully and was lengthened to accomodate my 300-500 mm lens+camera (~20" long), the deck art is done, the seat repaired and reinstalled...I will be on the water at 0630h tomorrow morning. That squiggly blue line that you see running from the read deck to the side of the cockpit is a scale copy of my kayaking route, ~2500 kms, starting at the Crossing in the Alberta Rockies and ending on the Nelson River at Rossville, northern Manitoba. The line has marks showing every camping site I used and some of the cities and villages I passed along the way. That front hatch currently has metal flake set in epoxy on top of it and I am thinking to remove it and paint it blue like the rest of the front deck. Let me know if you think the metal flake works...currently I don't think it does.
Full Length Image Vj Finished
Full Length Image of Finished VJ
That looks amazing. Great…
That looks amazing. Great job.